Tuesday, November 30, 2010

Free Printable Letters FROM Santa!

I'm back! What a perfect vacation we had. Honestly, hubby made me leave a day early and while that threw off my packing schedule a bit, I'm sooooo glad he did. The original day we had scheduled to travel ended up being the first day of a very heavy week of snow that followed. They had record breaking snowfall and below zero temperatures. It was exactly why we went. My husband loves the dark cold gloom of winter, don't ask me why! It was really beautiful, I must admit. But I do love the weather we came back to in SoCal. It is sunny and the air is cold and crisp.
We did get our family photos done. The day we did it, it was like 7 degrees below zero and windy! But we managed and got some great shots in the snow by the lake. They won't look like all my friends cards I'll be getting from the beach, I know that!
Now that I'm back and in Christmas card and photo book mode, it reminded me of something else I plan to send out along with Christmas cards. Last year Chloe recieved a letter in the mail FROM Santa! It was very very exciting for her. One of her friends mother sent it. Chloe is 8 and has started questioning Santa's reality. I know this is the last year she will "believe" so I want her to get the letter this last time. I know a ton of other young children I can send it to as well. If you want to send some letter's from Santa, click HERE. They're free!
signature2

Saturday, November 20, 2010

Thanksgiving Wine Suggestions

We're Outta Here!
We are getting ready to head out for the holiday. It seems that no matter how well I plan and no matter how early I start preparations, I'm still running around frantically before it's time to go. I'm so looking forward to this trip to Coeur d'Alene. We are also hoping to make a day trip west to Seattle since none of us have been there. We'll see if that works out. I booked a photographer, so we are going to get professional photos done while on vacation. Hopefully we will be able to do an outdoor shoot if the weather permits. Since I'm not cooking for Thanksgiving this year, I won't be posting my fab appetizer recipes. (Maybe next year!)

But, I did want to give some wine suggestions. I happen to know a little about wine, maybe even a lot compared to some. I studied wine over the course of three years. I've worked in all aspects of the wine industry. I have worked as a sommelier in a fine restaurant, I have sold wine as a distributor to stores and restaurants, and I have worked selling wine directly to the customers either in a store or by leading private wine class parties.

But I digress, my point is that you can trust my advice in regards to this subject! Thanksgiving wine selection is pretty easy and straightforward. For a typical traditional Thanksgiving dinner my selection for red is Pinot Noir, something from the Oregon, perhaps, and a for white, a Riesling. Now with Riesling you can go a couple of different routes. I would suggest a dry or semi-sweet. Germany and Alsace are good bets. I also like one they have at Costco, from the Coppola Collection (California produced). It is called Sofia (after his movie-producing daughter). It comes in a fun, lovely bottle. My guests always seem to enjoy every last drop of it!

Just spend what you can afford. There are great wines in a variety of price points. I think a good starting point is $11-13 a bottle. Of course you can always go up from there, but you don't want to go through all of the trouble of cooking a great meal only to pair it with crappy wine. And if you're buying for a hostess gift, spend at least $20. Either buy one nice bottle or get two, a red and white. Definitely ask a sales person to help steer you in the right direction. That's why they're there. Use them to your benefit!

These two wines are perfect because there are so many different flavors going on, and these will compliment while not overpowering them. I'm sorry I don't have more time to explain but the kids keep talking to me and I'm supposed to be packing!!!!
Happy Thanksgiving All!
signature2


Tuesday, November 16, 2010

It's My Birthday...Crown

Today Is My Birthday!
Today is my birthday! A couple days ago Chloe made this crown for me. She even thought to include little sheets I could tear off each day for a countdown. When she presented it to me, she made it clear that I was to wear it all the time leading up to my birthday...."Even in public," she said. Was she kidding, I thought?

So on Sunday we all had to go out to pick up some supplies for a school project (and my wine ornaments) at Michael's. Being the mom I am, I happily adorned my birthday crown. Let's just say on a Sunday afternoon there were no shortage of shoppers. There were a lot of looks my way, a little girl who pointed and laughed, (no joke), and a past PTA president, with whom I had an entire conversation. I even stopped her to ask if she could take me seriously while I was wearing the crown. At the end of our chat, she tapped me on the arm, looked at me pathetically and said, "You're a good mom." Hmmm, I thought, I guess I am. But, really, I thought, how could anyone not honor a wish like that of their 8 year old daughter? It reminded me to have some childish fun while celebrating my birthday!


On the inside she wrote "If lost return to"....and my phone number.


While at Michael's Nash made a secret purchase for me, asking the store attendants their opinion on his idea. Whatever it is, I'm sure I'll love it. I already feel like the luckiest person in the world. I have all of life's greatest gifts already.
signature2

Monday, November 15, 2010

Wine Cork Ornaments

Wine Cork Ornaments


Aren't these lovely and adorable? I'm so excited. I have been wanting to make these little ornaments since last fall. (I know, I know!) After searching for an answer for what to do with all my wine corks I remembered this. I can't quite remember where I saw it. This was way too easy and I'm looking forward to making tons of these and giving them in sets this Christmas. These guys were my first try at it, so I'm looking forward to what else I can do. I picked up all my supplies from Michael's including a mini hand drill and I paid $4 for the set of three key charms. Here's a simple photo turtorial, so you can make them too. Just don't forget to share your ideas with us after you've made some. Let's get started, shall we?

Some supplies (shown below) you'll need is a drill, small drill bit, cord ribbon (in the ribbon section), glue, scissors, 9mm split rings (they look like mini key rings), decorative charms with an attached split ring, & buttons with holes.

First, drill a hole through the center of the cork. From one side, through to the other. The hole has to be big enough to thread your cord ribbon through.


Next, attach the split ring (#1) onto the charm(#2). Cut a piece of cord ribbon to 12-18 inches in length. Slide your charm onto the ribbon as you would a necklace.


1.) Slide on the button. One end of the ribbon through one button hole and the other side of the ribbon in another button hole. 2.) Thread both ends of the ribbon through the hole in the cork. 3.) Add a little glue to the button and pull the ribbon so the cork and button are affixed. 4.) Add one or two more buttons as you did in step 1 and 2. Then glue those in place. You should now have something that looks like (from top to bottom) button, button, cork, button, slip ring, slip ring, charm. All held by the ribbon and glue.


To further secure your glued button, simply loop the ribbon one time as if you were going to tie your shoe. Just don't make a bow or not. Now towards the end of the length of your ribbon tie a double knot. Tight. Cut off any excess ribbon.

Wha-La!

ADDENDUM: Dec 27, 2010
I'm adding some more photos to this post, I have been experimenting with different charms, the crystals are expensive, but I really love them. I have also started using a different type of cord, I picked up in the jewelry making section. The cupcake one is perfect for the baker in me, and the ones with the crystal look great hanging from my rear view mirror, although I'm not sure if that's a safety hazard! If you choose to go that route, cut your cord extra long. I also experimented with beads and I started using larger slip rings :


signature2


linkparty

Saturday, November 13, 2010

Cake Decorating Book Giveaway Winner!

Congratulations Sue!
You're the winner of the beautiful Toba Garrett Wedding Cake Decorating Book.
You should receive an email from me shortly.
Stay tuned for more great cookbook giveaways in the month of December.
signature2

Tuesday, November 9, 2010

Recipe Blog I love and Easy Cinnamon Bread Recipe

I love the blog Plain Chicken. All of the recipes that I have tried from Plain Chicken have made it into my Tried and True cookbook binder. To qualify to be in the Tried and True Cookbook binder I must have made and loved the recipe at least 3 times. The latest Plain Chicken recipe to make it in was this Parmesan Skillet Bread.
http://plainchicken.blogspot.com/2010/09/garlic-parmesan-skillet-bread.html
It's a great addition to most any dinner but recently I tried a sweet breakfast version using the same method.

Cinnamon Skillet Bread
1 can flaky buttermilk biscuits, cut in quaters
3 Tbsp butter
2 tsp prepared cinnoman and sugar mix

8" saute pan
1/4 cup powdered sugar
Water or milk, start with a teaspoon
Preheat oven to 350.  Melt butter in saute pan.  Add cinnamon and sugar.  Add quartered biscuts and toss in saute pan.  Place whole pan in oven and bake for 15-20 minutes.  Remove from oven and slide onto platter for serving. Combine powdered sugar and liquid, one teaspoon at a time until a desired constistency is reached. It should drizzle off a spoon.


signature2

Monday, November 8, 2010

Millionaire's Spinach Salad

Menu Monday: 
Monday: Crock Veggie Beef Soup (leftovers are great for lunch throughout the week)
Tuesday: Chicken Ciabatta Sandwiches
Wednesday: Breakfast for Dinner (a kid favorite!)
Thursday-Sunday: Veteran's Day Holiday Getaway! No cooking!

Here's an easy Millionaire's Spinach Salad recipe we love:
1/2-3/4 of a bag of baby spinach or 1/2 spinach & 1/2 arugala
1 avocado, sliced
1/2 can of hearts of palm*, chopped (I omit the pieces that are not tender)
1/4 cup Gruyere, shredded (or chunks of mozzerella)
1 Tbls. grated Parmesan
1-2 Tbls. olive oil
Place spinach in large shallow bowl, top with avocado, cheese, & hearts of palm. Add a bit of salt and fresh ground pepper to taste. Lightly drizzle salad with olive oil.
*Hearts of Palm is a vegetable harvested from the inner core and growing bud of certain palm trees. It can be found in the canned vegetable aisle of most grocery stores.

*This post is linked to Tasty Tuesdays @ 33 Shades of Green.*

Product Review:
Ghirardelli Chocolate Bundt Cake Mix
HAVE YOU SEEN ME?
By now you know my love of cakes and for 'good things simple'. Well this is the epitome of good and simple. I always keep Ghirardelli brownies on hand for last minute entertaining. I pick up a large box from Costco that has about 6 mixes in it. Last time I was at Costco, I saw that they carried these instead. I grabbed it to try even though there are only 2 mixes. I whipped one up on Saturday night and let me tell you....AMAZING!!!!!! I made the bundt cake shown on the front, but you can also make it into cupcakes, or a layer cake. It even comes with powdered sugar for dusting. If you made these as cupcakes, I'm sure you would get some type of Mom Of The Year award. Here's the problem...I searched for these all over the Internet and they are virtually non-existent. Couldn't find any trace of them. So I called Ghirardelli and they said this is a new product that is seasonal. Here's the bad news. It's only sold at certain warehouse stores in certain states. California, Arizona, Illinois, and Utah are the lucky ones. I am going to head to my Costco this week and see if they still have it. If so, I will make it a giveaway. If you would like more information you can call 1-866-645-8080. Oh and last thing, it's MILK-FREE. It does however have its little disclaimer about how it is manufactured on equipment that also produces products containing milk. All of the lactose free people I know are not affected by this.
signature2

Saturday, November 6, 2010

My Decorated Cakes!!!

CAKES DECORATED BY ME! 
          Pick your favorite!


Please do not use any of my cake photos without permission! Thanks!

The following photos are from Toba's beautiful book that I'm giving away!
*This giveaway is now closed*


Wedding Cake Art and Design: A Professional Approach


It's November, it's my birthday month, and Thanksgiving! I can't think of a better time to treat my loyal readers (you know who you are;-) to a my first giveaway! From my post last week, you now know that I decorate cakes as a hobby. I've done wedding, Quinceañeras, & milestone birthday cakes. I always feel very honored when someone asks me to do a cake for them. I feel even more honored if they ask me a second time! I have lots of cake books! Sometimes hubby will accidentally buy me a duplicate book. My loss is your gain. I will be giving one lucky reader this beautiful cake decorating book by Toba Garret valued at $50! It's chock full of recipes, photos, and how-to's. You will love it, I promise! I am using http://www.giveawayscout.com/ to help promote my giveaway. You can too by going to thier website and following the submit a giveaway instructions!
How YOU can WIN:
1. Simply become a follower and leave a comment telling me that you became a follower or leave a comment telling me you are already a follower. This giveaway is open to U.S. residents only. 
2. Receive an additional entry by posting a link to this giveaway in your blog post. Leave a comment telling me you have done so.
3. Gain a third entry by leaving another comment telling me what cake of mine you like best.
signature2

Tuesday, November 2, 2010

How to bake a professional looking layer cake


Tricks to bake a professional looking layer cake.
This is my way, I know there are other ways and everyone has their own tricks. These are mine. This is how I have learned to do it after many years of research! Make sure you have plenty of room in your refrigerator AND freezer before you start! Oh and give yourself a couple days to prepare this. I like 3 days.

Prepare two-2" round pans of your choice with shortening, flour, and parchment paper as shown below. Use your favorite recipe and bake at 325 degrees instead of 350. You may have to increase the cooking time


I fill my cakes pretty high, trim them, and save the scraps for Cake Pops. I also TAP or PAT the pans on the counter a few times before baking to release any air bubbles, as shown in Step 4 above.


Shown below, I use a large serrated knife (bread knife) to level, resting the knife on the side of the pan, as a guide. Don't worry if it's a little uneven, you're going to fill it anyway. You also need to release the cake from the sides of the pan. Make sure the knife stays along the pan or else you will cut into the side of the cake.


While the cake is still in the pan, cover it with a paper towel, then your rack. Then invert the cake to finish cooling so you can prepare your pans for the next step. While we don't necessarily need the paper towels for this particular cake it has become a habit. The purpose is so you don't get rack marks on your cake. Peel back the parchment as shown below. Wash and dry your cake pans.


After they have cooled, and are still on the racks, cover them with long pieces of saran wrap, then the pan. Now you can invert the cake back into the pan and wrap it with the saran wrap. See below. If you are just freezing over night, the saran wrap is enough, but if you are freezing for any lengthier amount of time you should also cover the WHOLE pan in foil as well. I always freeze my cakes if I have time. It somehow makes them more dense and moist.

Once you are ready to defrost, pull them out and invert them back to the rack. No paper towel is necessary. I keep the saran wrap lightly draped over them while they thaw as it absorbs the ice. Again, I'm not sure how?? You don't need to thaw them too long. I usually prepare my filling and a batch of icing. They're usually still cold and firm enough to handle, just no longer frozen. Check them after about 30 minutes.

Prepare your cake board by applying some icing so that the cake will not slide around. Position the cake board on top of the cake. Once you invert it the flat, crust side will be on the bottom and the cut, cake side will be facing up. Using a #24 tip, pipe a damn around the circumference, as shown in step 4, below.


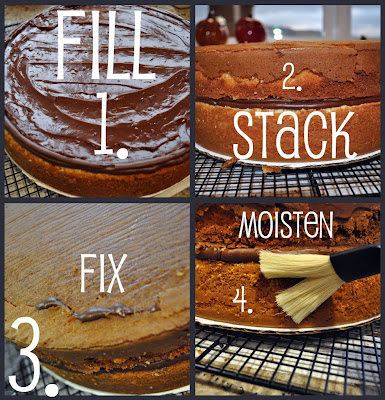
As shown below fill the area with your choice of filling. I like to use pudding. Then....very carefully, lift the other cake and set on top of your filled layer. Make sure the flat, crust part is facing upwards. Imagine your making a sandwich with two end pieces of bread! Now fix any damage, with icing as your glue. Then using a pastry brush, use syrup to moisten the top and sides of the cake. You can use simple syrup, or those flavored coffee syrups.
Be creative ;-)


Apply a crumb coat, using very thin icing over the entire cake. Then refrigerate until the icing has hardened. I usually leave in overnight to seal in the moisture.


Load your icing into a LARGE piping bag (18") with the large tip contraption shown below. Use this to frost your cake. Teeth will face the cake. The other side of the tip is straight edged. The neater you complete this step, the easier it will be later. It helps if you have a rotating cake stand. I was using new icing that I had never used before, and it was so stiff, I didn't have the strength in one hand to complete the task, hence the sloppiness.


While your cake is still on the stand use the metal pastry spatula tool shown below to smooth the icing. You can spend some time perfecting this! *I use those little rubber cabinet liners to keep my cake from sliding off the stand. I also use them in the cake box, and the car! Then refrigerate again for at least a couple of hours.


Using a VIVA paper towel (Yes it needs to be VIVA), and that little fondant smoothing tool, smooth that cake some more. Again, I have spent a good amount of time on this before. Of course, here I only spent about 10 minutes. I was donating it, so I wasn't too concerned about perfection!


Now is the fun part. Close your eyes. Channel your Play-Doh loving inner child self, and have at it. Fondant is just like Play-Doh. I have been using Duff's fondant from Michael's. I add a little fingertip of glycerin to it to prevent it from cracking or getting elephant skin syndrome. You just color it, knead it, and roll it as thin as you can. Make sure your work surface is clean and dusted with cornstarch. Then use your cutters or template to create your work of art.


I didn't do it here, but lastly I would apply a simple border on the bottom.


This cake was made in two 12x2 inch rounds. It will feed approximately 30 people. Due to it's height, it is not a good idea to serve it in wedges. Cut as directed below, there are guides for each size.


I hope you find this useful. There are so many useful tutorials for cake decorating techniques on You Tube.
Do you have any cake decorating tips or tricks you can share with us?


signature2
linkparty