Showing posts with label Custom Made. Show all posts

Sunday, June 19, 2011

Dad's Favorite Chex Mix

This Father's Day the kids whipped up some of their Dad's favorite homemade Chex Mix. This recipe came from his grandmother and he asks for it often. I used my Father's Day Printables to make the labels and picked up the jars from Cost Plus World Market.


Chex Mix Recipe

Ingredients:
1 Box Rice Chex
1 Box Corn Chex
1 Large Bag of Pretzel Sticks
2 Cans Cashews
1 Bag Pecans
3 Small Bags of Sliced Almonds

Sauce Ingredients:
4 Sticks Butter
4 TBS. Worcestershire Sauce
3 Tsp. Tabasco Sauce
1 TBLS. Lawry's Seasoning Salt

Directions:
Melt all sauce ingredients in a small sauce pot. Divide dry ingredients into two large roasting pans. Divide sauce ingredients among the two pans. Fold the sauce gently throughout the cereal and nut mixture, being careful not to crush the cereal. Bake in a 250 degree oven for 15-30 minutes, stirring occasionally. Allow to cool and enjoy. Will keep for a couple weeks stored in an airtight container or ziplock bag.
signature2

Friday, January 14, 2011

How to Make a Wine Bottle Lamp-Photo Tutorial

Okay, so I've showed you all how to reuse your wine corks to make adorable ornaments, now I want to share how to put that bottle to further use. This is a fairly easy project and shouldn't take more than an hour. You can pick up a bottle lamp kit from Home Depot along with a glass drill bit if you don't already have one. Yes, you'll be drilling into the glass. Don't be scared, if I can do it you can too! Also, make sure to get a lamp shade that is designed like the one in the picture. You can find them at Walmart or Ross. Finally, if you want to decorate the shade, you can get some decorative fabric tasseled ribbon. I got mine from the fabric department at Walmart.
Safety First!!
Some safety rules before you start. Wear goggles, and good thick gloves while drilling. Cool your drill bit by dipping the tip into cool water every minute or so. Finally, when working on the electrical part of the lamp, always make sure it is unplugged! Place your bottle on a thick towel and gently but firmly hold the bottle steady and apply slight pressure when drilling. You must apply some pressure.


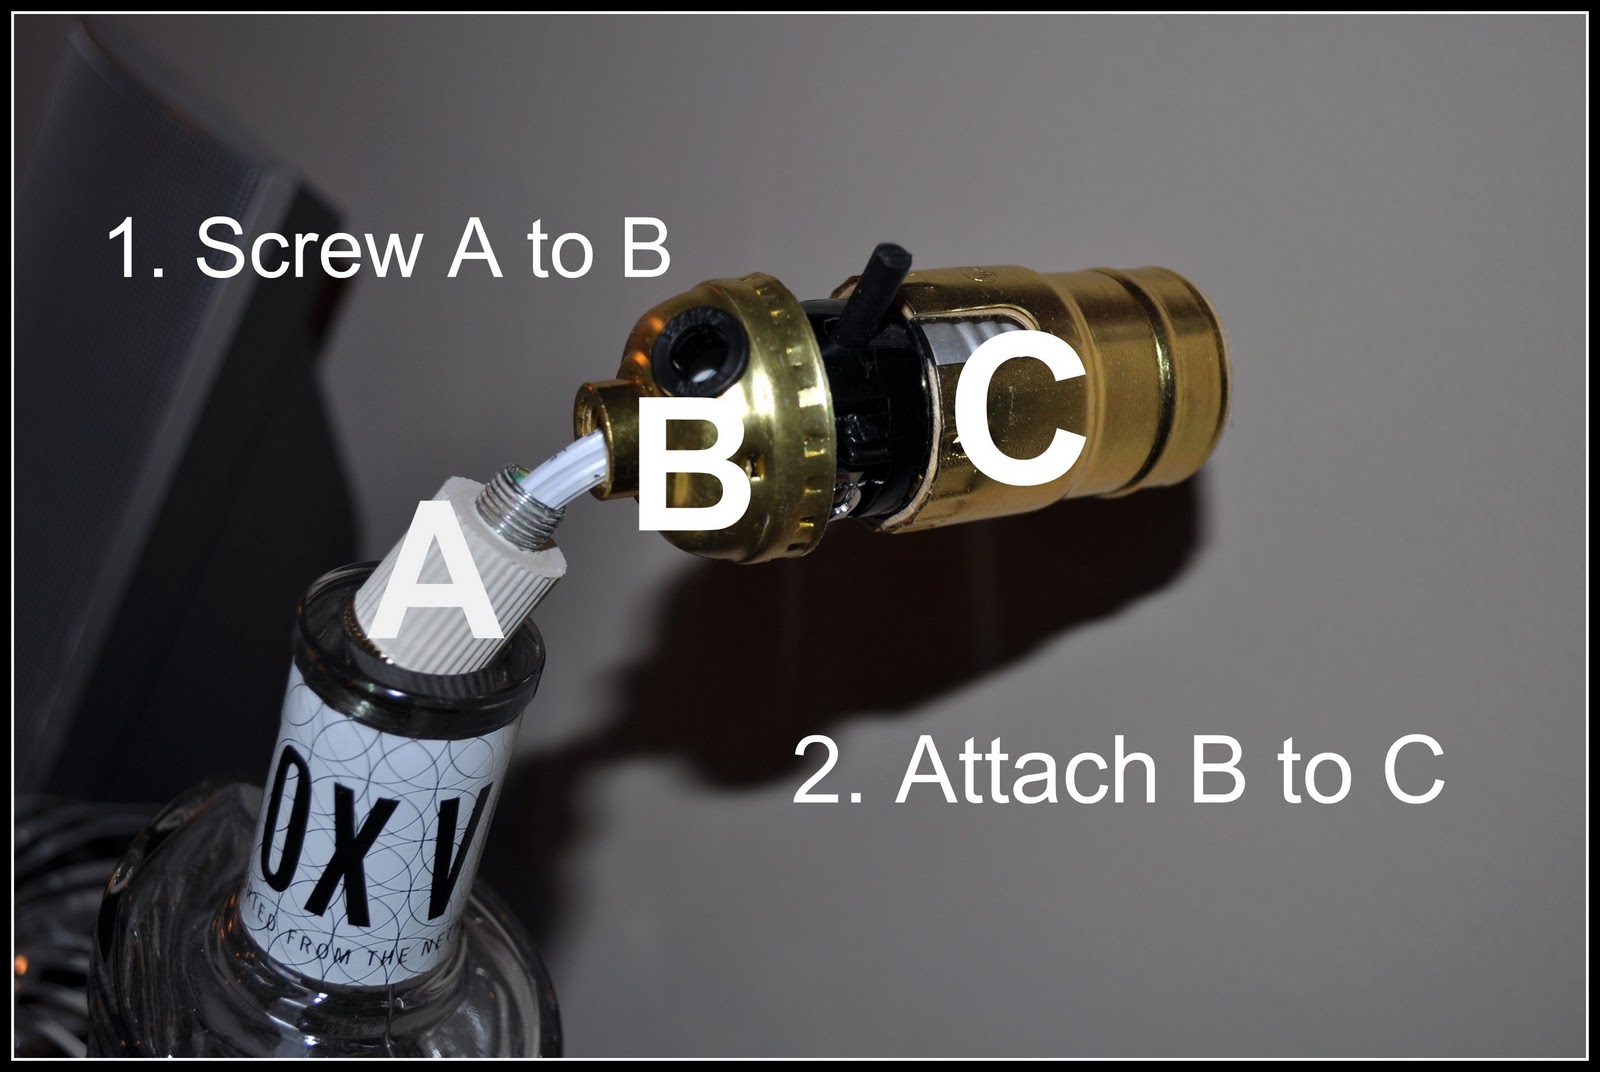
Clean dust and glass from bottle. This next photo is a series of four pictures showing how to put the pieces of the kit together. This is just quick sequence info, scroll down for the detailed instructions.

Detailed photo tutorial begins here:


Now we are back to this photo, as a recap:
Now put your lightbulb in to test. Plug in the lamp and turn it on. If it doesn't work, unplug and then go back and make sure your wires are securely fastened to the screws and the screws are tight.

Now, you can decorate your lampshade at this point if you want. Simply measure, cut, and hot glue your tassel ribbon.


Good luck and feel free to contact me should you have any questions. And yes, you will have some pieces left over from your kit.
signature2


Monday, November 15, 2010

Wine Cork Ornaments

Wine Cork Ornaments


Aren't these lovely and adorable? I'm so excited. I have been wanting to make these little ornaments since last fall. (I know, I know!) After searching for an answer for what to do with all my wine corks I remembered this. I can't quite remember where I saw it. This was way too easy and I'm looking forward to making tons of these and giving them in sets this Christmas. These guys were my first try at it, so I'm looking forward to what else I can do. I picked up all my supplies from Michael's including a mini hand drill and I paid $4 for the set of three key charms. Here's a simple photo turtorial, so you can make them too. Just don't forget to share your ideas with us after you've made some. Let's get started, shall we?

Some supplies (shown below) you'll need is a drill, small drill bit, cord ribbon (in the ribbon section), glue, scissors, 9mm split rings (they look like mini key rings), decorative charms with an attached split ring, & buttons with holes.

First, drill a hole through the center of the cork. From one side, through to the other. The hole has to be big enough to thread your cord ribbon through.


Next, attach the split ring (#1) onto the charm(#2). Cut a piece of cord ribbon to 12-18 inches in length. Slide your charm onto the ribbon as you would a necklace.


1.) Slide on the button. One end of the ribbon through one button hole and the other side of the ribbon in another button hole. 2.) Thread both ends of the ribbon through the hole in the cork. 3.) Add a little glue to the button and pull the ribbon so the cork and button are affixed. 4.) Add one or two more buttons as you did in step 1 and 2. Then glue those in place. You should now have something that looks like (from top to bottom) button, button, cork, button, slip ring, slip ring, charm. All held by the ribbon and glue.


To further secure your glued button, simply loop the ribbon one time as if you were going to tie your shoe. Just don't make a bow or not. Now towards the end of the length of your ribbon tie a double knot. Tight. Cut off any excess ribbon.

Wha-La!

ADDENDUM: Dec 27, 2010
I'm adding some more photos to this post, I have been experimenting with different charms, the crystals are expensive, but I really love them. I have also started using a different type of cord, I picked up in the jewelry making section. The cupcake one is perfect for the baker in me, and the ones with the crystal look great hanging from my rear view mirror, although I'm not sure if that's a safety hazard! If you choose to go that route, cut your cord extra long. I also experimented with beads and I started using larger slip rings :


signature2


linkparty

Tuesday, October 26, 2010

Custom Made ABC and 123 Book

I adore this idea that my SIL's Mom did for her when she was pregnant. She assigned everyone in her family  a letter or number and had them create a design for each. She put it all together in a photo album to make this lovely little book that her granddaughter will truly cherish. She presented it to her when she was born. I can't think of a more fun way to teach the ABC's and 123's!


Congratulations to my BIL and SIL by the way, who welcomed  sweet little Avery on September 18th, 2010. And thanks for letting me share this special gift that was made just for her!
signature2

Tuesday, October 12, 2010

Homemade Halloween Costumes

My Best (and one of the worst)
Homemade Halloween Costumes

After last years SpongeBob costume I promised I would never buy another Halloween costume.


 My cousin and I made this last year for Chloe. I got the perfect box (for free) from our local hardware store. I think we got really lucky on the box. It was tall and narrow, already had those narrow holes for the eyes, and it had perforated circles where her arms could come through. I purchased the tight's on EBAY for $6 and I also grabbed a small can of yellow paint at the hardware store. The rest of the colors we already had.

We downloaded an image from Google and freehanded it in pencil on the box. Then we painted it. It was barely dry when we left to go trick-or-treating.
The whole costume took about an hour and a half.
She got sooooo many compliments.
Little kids where very excited to see Spongebob.
They were pointing to show their parents!
Toilet Paper Mummy
I don't remember what led to this homemade mummy costume. I do know that we showed up at my friends house with Nash in his white pj's and a roll of TP. I wrapped him up and we were off. By the time we got home he was back in just his pj's because a little toilet paper fell off every time he walked. I guess we inadvertently TP'd the neighborhood. OOPs!


The following are all costumes I made last year and sold on Ebay. I bought the onesies and I learned how to make the tutu's, bows, and baby legwarmers from YouTube.
I just love YouTube!


Do you have a great costume that you
have made for Halloween?
 Tell us about it!

sig2

Friday, September 24, 2010

Playdate Invitation

This year we decided to put Chloe in the school near our house. While she knew a few of the kids from playing Little League with them, she didn't know any kids well enough to have a playdate. I don't know any of the parents, so she won't be having any playdates at their houses! Not all the parents show up during morning drop-off or afternoon pick-up so it has been impossible for introductions or arrangements. So I turned to the age-old INVITATION!

Remember, I like good things and I like them simple. So I wanted something cute that would make an impression but I didn't have a lot of time. I don't have any fancy shmancy software either. So I created a simple invitation in Microsoft Word.


1. Open a new word document.
2. Click Insert
3. Insert Clipart
4. Type "vine" in the search box in the clipart window. Choose the background.
5. Stretch the picture over 1/2 the page of your word document.
6. In "format" tab click on the "text wrapping" icon, then check the "behind text" option.
7. Choose a cute font and start typing.
8. At this point I made another one on the bottom half of the page, but this is optional.
9. Print on white cardstock.
10. Cut and trim your invitation and hole punch two holes 1" apart on the top.
11. Thread your choice of ribbon through and tie in knots as close to the paper as possible so the ribbon doesn't slip through.
12. I added a 3D cupcake sticker.

 I let her take one invitation to school today and she gave it to her friend.
The friend saw me after school today and was very excited!

P.S. No need to try and call me or come over,
I changed the address and phone number for the purpose of this post! :-) 


sig2