Showing posts with label Treat. Show all posts

Friday, June 1, 2012

Cake Mix Cookies

Folks, you are gonna hate me for these! Five minutes of work never tasted so good! And if you're too tired to make them, they're easy enough for your kiddos to make for you. Let their creativity go wild! I used a box of yellow cake and semi-sweet chocolate chips. These cookies came out nice and puffy, just how I love them! They were slightly crisp on the outside and as soft as a pillow on the inside.


Makes 2 dozen cookies

Ingredients:
1 box cake mix (any flavor)
2 eggs
1/2 cup oil
1/2 cup chocolate chips
If you choose to add in fruit or nuts, I would start with a 1/2 cup. These may seem oily as you are mixing them up but don't worry, they will come out perfect.

Preheat oven to 350 degrees.
You don't even need to pull out your Kitchen Aid! In a medium bowl, using a wooden spoon, mix cake mix with oil and eggs. Mix in your chocolate chips. Scoop by the tablespoon onto a cookie sheet. Bake for 10-12 minutes. I found that with my particular pan I had to rotate the cookie sheet from the middle rack to the top rack after 5 minutes of baking. This ensured that they didn't burn on the bottom. I will be trying and posting more combinations I'm sure!
signature2

Friday, May 11, 2012

Portable Cupcakes


In addition to a very long week of daily pampering and gifts for Chloe's teacher we sent in some cupcakes for her this morning. For these portable cupcakes you just need a package of Wilton clear party bags, size 4 x 9.5 inches and a package of 9 oz. clear plastic cups. The 'Thank You' tags are the same ones I used last year. They were made by Skip To My Lou. You can find them on Tidy Mom's blog. Just bake your cupcakes in liners as usual. Then you can experiment. You can remove the cupcake from the liner and add  it to the cup and frost it or you can keep it in the liner and add it to the cup.  I added either tissue paper, decorative liners, or a regular liner to the outside of the cup and placed it in the bag. Tie the spoon on with a ribbon, add your tag with a bit of hot glue and your set!
  signature2

Friday, May 4, 2012

Black and Blueberry Mini Galettes

I'm on the galette bandwagon. Sweet or savory, I'm in love. They are rustic, which I like to think of as easy and imperfect, but still lovely and delicious. I love my shortcuts so I start with some pre-made pie crusts. Pillsbury. You will find these in the refrigerator section near the biscuits and stuff. I didn't really follow a recipe for this, I just looked over the Internet at some different recipes and based this off that. I'll do my best to give the "recipe" here. I used black and blueberries, but you can use any berries you wish. Also, I used fresh blackberries, but used frozen blueberries. You can really use whatever fruit you prefer such as raspberries or peaches.

rus-tic [ˈrəstik]
1. Having the simplicity and charm that is considered typical of the countryside
2. Charmingly simple or unsophisticated

ga-lette[gah-LEHT]
1: a flat round cake of pastry often topped with fruit
2: a food prepared and served in the shape of a flat round cake <a galette of potatoes>


Individual Berry Galettes

Ingredients:
2-3 cups berries, rinsed
2 Tbls sugar + more if needed
2 tsp cornstarch
2 thawed pie crust circles
Coarse sugar to sprinkle crust
Milk to brush on crust
Vanilla Ice Cream for serving(optional)

Preheat oven to 450 degrees. Line a baking sheet with a Silpat or parchment paper. Add your berries to a bowl. Add 2 Tbls. sugar, or more if you are using tart berries. Up to 1/4 cup of sugar total can be added. Add cornstarch to berry and sugar mixture and gently mix well. Allow to rest. Meanwhile, you want to find a round bowl or similar tool. It should be able to make 4 smaller round circles from your pie crusts. I used a 350 ml, 5 1/2 inch wide Rubbermaid container.


Cut out four pie rounds. Leaving a one inch margin around the edges, spoon berries into each individual pie round. Fold up the the sides, pinching together when necessary. Perfection in this step is not needed. Your goal is just to keep the berries supported. Brush a little milk on the folded edges of the crust and sprinkle with coarse (raw) sugar. Bake for 10-15 minutes, then reduce heat to 375 degrees and bake for an additional 40 minutes. Times and temps may vary slightly depending on your oven. Please watch these, check them often. Lay a piece of foil over the top if the crust is browning too fast. Once the berry juice starts bubbling they should be almost done.


signature2

Friday, October 29, 2010

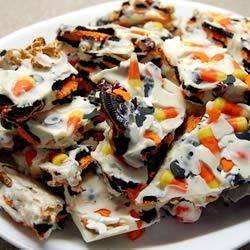
Candy Corn Bark

CaNdy CoRn BArk


I just love All Recipes! I saw this on my All Recipes Newsletter this morning and wanted to share it. I may have to whip up a batch for Sunday. You can check the site for reviews and substitutions.


  • 16 Halloween-colored chocolate sandwich cookies, chopped


  • 1 1/2 cups broken small pretzels


  • 1/3 cup raisins


  • 1 1/2 pounds white chocolate, broken into squares


  • 2 cups candy corn


  • orange and brown sprinkles


    1. Spread the cookies, pretzels and raisins evenly onto a lightly greased small baking sheet. Melt chocolate in a bowl set over a pan of simmering water, or in the microwave, stirring frequently until melted. Remove from the heat while there are still a few chunks, and stir until smooth. White chocolate burns easily.
    2. Drizzle chocolate with a spoon over the goodies in the pan, spreading the top flat to coat evenly. Top with candy corn and sprinkles. Let cool until firm. Break into pieces and store in an airtight container.
    Some of the reviewers mentioned the candy corn made it overly sweet, and someone mentioned they added Halloween colored peanut M & M's. If I make this I'll probably cut down on the candy corn, add the M & M's, and omit the raisins.

    Click HERE to see the recipe with all of it's reviews.

    Recipe By: Julie G.
    Photo By: MeredithRae24
    signature2